
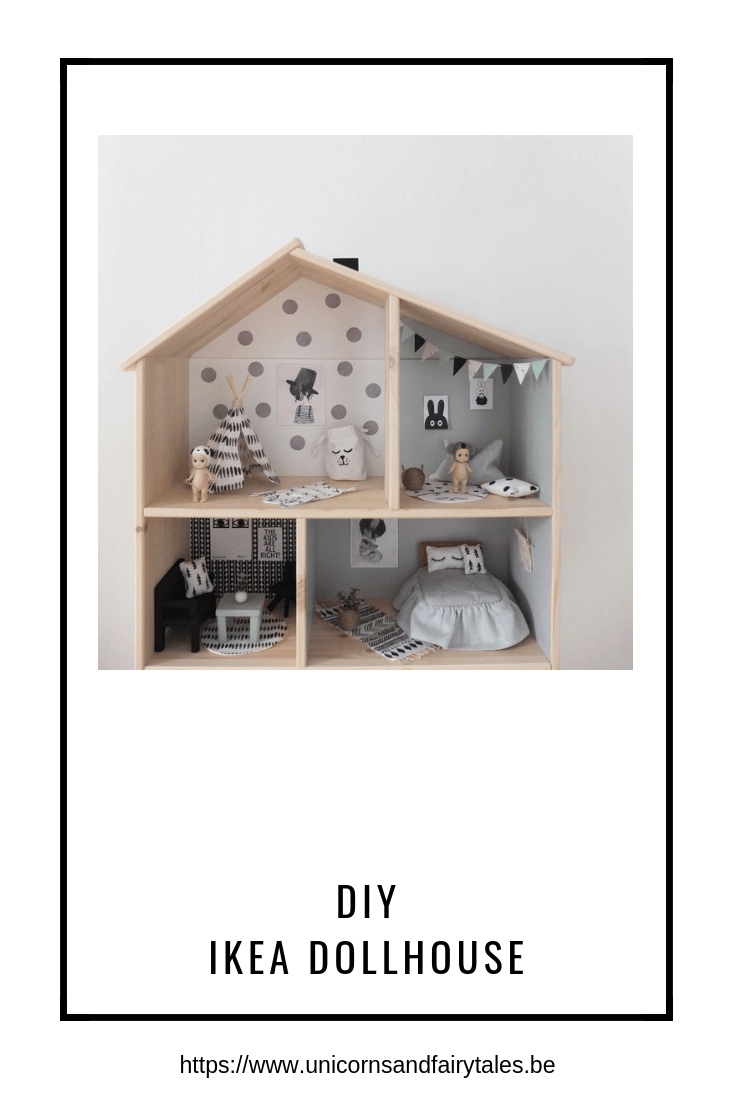
Toen ik dit leuke IKEA dollhouse via Instagram zag voorbijkomen op één van mijn favoriete feeds moest en zou ik haar vragen om een DIY te maken voor Unicorns & Fairytales. Want geef nou toe, dit is prachtig! – When I saw this perfectly styled IKEA dollhouse on one of my favourite instagram feeds, I had to ask her to write a blog for Unicorns & Fairytales. Just because… it is so beautiful, don’t you think?
Ikea dollhouse pimpen
Ik ontmoette Karolina via Instagram. Ik was meteen betoverd door haar mooie feed en haar creativiteit. Het tekort aan tijd en teveel ideetjes weerhouden me om deze zaken zelf te doen, anders zou ik ze al lang zelf gemaakt hebben. Haar versie van het ‘Ikea dollhouse’ vond ik zo mooi dat ik haar vroeg om een DIY beschrijving te maken. Ze was meteen enthousiast.
Hi there! My name is Karolina Strömblad and I’m from sweden. I will do a guest blogpost for Unicorns & Fairytales about the Ikea Dollhouse I decorated. I made this IKEA dollhouse for my 2 1/2 year old girl for christmas. This house only cost me 399 SEK (=about 42 euro) to build but of course it depends on what you have at home which you can use/reuse. I will walk you through the rooms and tell you how I did it!
lees ook: DIY eerste verjaardag thema woodland
Volg je Unicorns & Fairytales via Instagram?
Playroom Dots
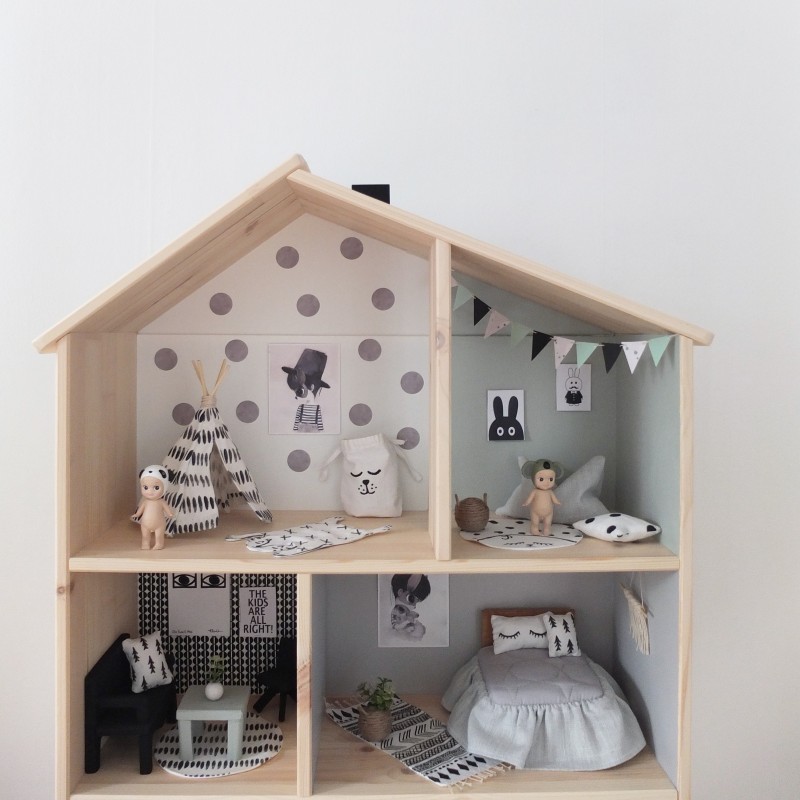
I wanted this room to be similar to my daughters room. I made the tipi from fabric which I bought from Ikea. The tipi is a little difficult to explain how to do. But I will try! I Have done that for her room so I just knew how to put it together. You have to cut out 4 pieces shaped like a triangle. One of them you have to cut in to two pieces for the door. You have to sew four channels to put the “barbecue sticks” in and you also have to sew the edges and fold them up. The last thing to do is bind the sticks together for more stability for the tipi. I used a thicker creme/white thread to wrap around the sticks. For the walls I used the lovely stickers I got from Stickstay. Easy to use and move around! The carpet by “Roxymarj” I used the textile non toxic pencil and sewed it together the same way as the other carpets that I will explain further down. For the “tellkiddo” storage I used textile pencil once again and sewed it almost the same way you make a pillowcase. First you need to make a channel/passage where the storage should be open and in the channel/passage you also pull the thread through.
>>> Ze wilde dezelfde kamer als in de werkelijkheid. Het is haar goed gelukt vind ik. Ze maakte de tipi met stof die ze in IKEA kocht. Om het makkelijk uit te leggen hoe je de mini tipi’s maakt verwijs ik je graag door naar deze blog waar uitgelegd staat in het NL hoe je ze maakt. De bollen heeft ze gemaakt met stickers en de opbergzak en mat van stof en een textielstift. Ze naait veel van deze spullen zelf. Je kan dus zelf zien wat jij graag in de kamer hebt staan. Vaak kan je makkelijke beschrijvingen vinden op het internet.
lees ook: DIY monochrome dollhouse
Dinner room
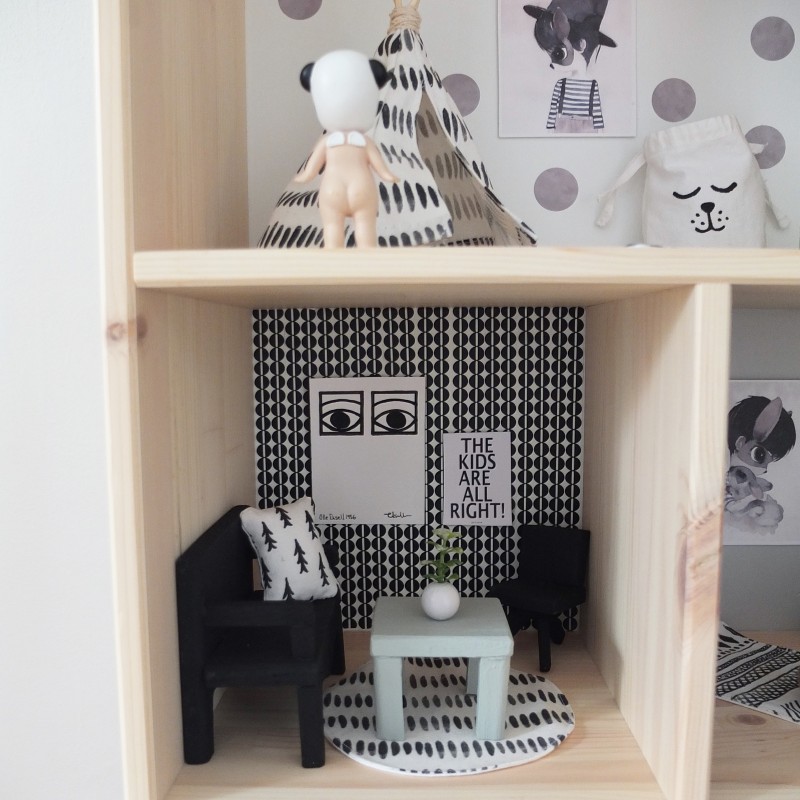
I did some sketching for the furniture and my partner helped me to make the furniture of small pieces of wood that we had at home and with a “glue gun”. I painted it with colors that we have used for our home to paint walls etc. For the wall I used washitape and that is just perfect for decorations. For the posters I recommend to print it out from a printer and glue it to a thicker paper/cardboard so it it’s stronger when you play with it. If you don’t have a printer you also can draw the posters by hand. I did the “kakao” poster by Olle Eksell by hand. For the little flower on the table I used a “wooden ball” and painted it. I bought that little plastic flower in a decoration/furniture store and I just cut it of from the little pot it was in, so I could use it for more different decorations. I glued the flower in the whole from the wooden ball.
>>> Haar man heeft de meubeltjes gemaakt van overschot van hout. Zij heeft ze getekend. Met verf die ze ook gebruikten in hun huis hebben ze de meubeltjes geschilderd. De muur heeft Karolina bekleed met washi tape en de posters getekend of uitgeprint. Haar tip: gebruik wat diker papier of karton zodat ze niet stuk gaan tijdens het spelen. Het bloempotje op de tafel heeft ze gemaakt met een houten kraal (TIP: die kan je kopen bij de Viltshop) die ze geschilderd heeft. Het bloemetje heeft ze erop gekleefd. Je kan nep bloemetjes gebruiken of een echte bloem.
Bedroom
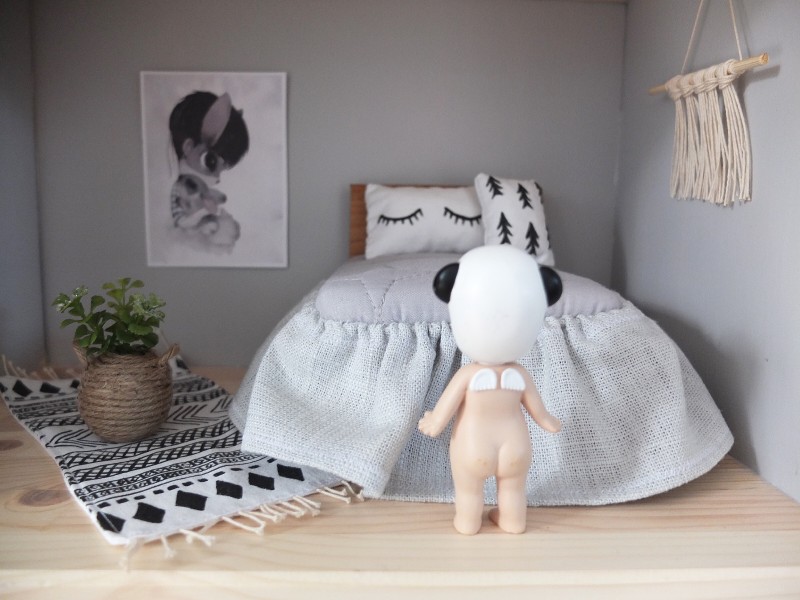
The lovely Mrs.Mighetto poster I actually haven’t printed out. I bought two posters from them and they arrived in a lovely package with this miniature poster so I cut it out of course! My partner made the bed frame after my sketching and measuring. I decorated it with fabric that I had at home. I did some sewing by hand to make the bed gown. For the little baskets I again used the “wooden balls” and glued hemp thread to it. I glued the flowers in that little hole the wooden ball have. The carpet of “housedoctor” are handmade and painted by hand so I used the “Fabrico” textile non toxic pencil again. I always cut out two pieces of fabric and sew the right sides together and then turn it over. I used a thicker thread to do the fringes and I sewed them on at the same time I sewed the right sides together. I sew them once more to get a nice finish of the edges and so the fringes will not fall off. For the lovely “wall hanging” I again used the thicker creme/white thread. I cut some more threads and made a knot around the little stick. For the sticks I used “barbecue sticks”.
>>> De leuke poster kreeg ze bij haar bestelling in mini versie. Haar man heeft het bed gemaakt uit overschot van hout. Uit stof heeft ze een bedovertrek gemaakt en heeft ze ook een kussen genaaid. Idem voor de mat. De tekeningen maakte ze zelf met een textielstift. Voor de mand gebruikte ze weer een kraal die ze omwond met koord. Heel creatief! Het decoratieve stuk aan de muur maakte ze met dikker koord en een satéprikker.
Playroom
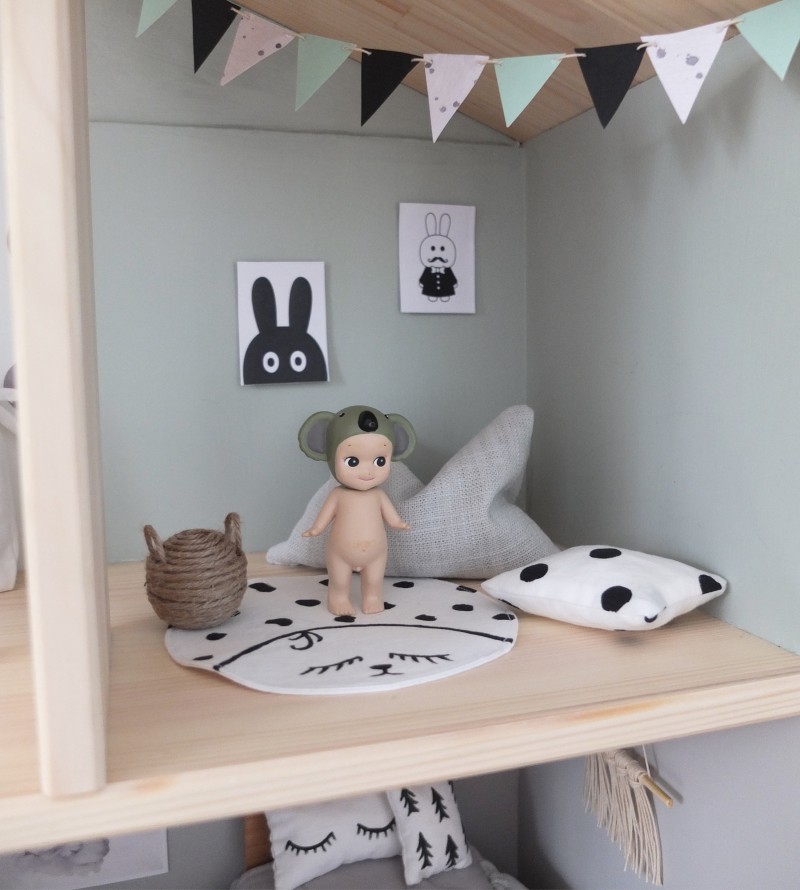
You can do a lot just with 100% cotton fabric and a textile pencil. (I just used old white sheets!) The carpet miniature of “Wille and Mille playmat” are handmade and painted by hand. For the two pillows I used fabric that I had at home. The “grey” big pillow is a beanbag I filled it with rice. For the little “olliella” basket I again used a wooden ball and glued the hemp thraed to it. I was so happy when I finally found a way to do it! The garland is made from thicker paper/cardboard and sewed together with a thicker tread that I also use for fringes to the house doctor carpet and for the wall hanging in the bedroom. The walls are painted with a color that we used for our kitchen wall (color code S 2005- G20Y).
>>> Dit is weer dezelfde werkwijze. De muren schilderde ze met een kleur die ze ook gebruikten in hun keuken. De beanbag maakte ze van stof, gevuld met rijst en de mat versierde ze met textielstift. De posters en garland zijn met de hand gemaakt en getekend.
What to use
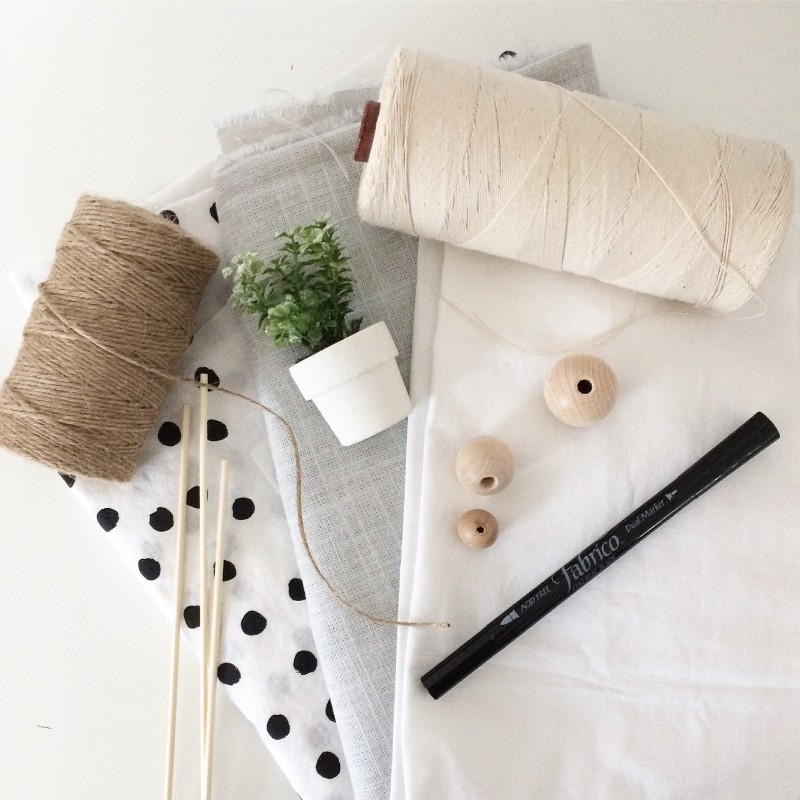
These are some of the things I used to make all the textile, flowers and decoration with. Use what you can find at home and just be creative. Sometimes it takes time to know how to do things. Use google/pintrest/instagram for inspiration and how for example to sew things. I hope I inspired you with this dollhouse! It is actually really nice and relaxing to just sitt down in the evening when the kids are sleeping!
>> Hier kan je zien welke materialen Karolina gebruikte om de meeste spullen te maken in het IKEA dollhouse. Ze geeft de raad om te gebruiken wat je zelf in huis hebt, creatief te zijn en je eigen draai eraan te geven. Je kan inspiratie opdoen op google/pinterest en instagram om verschillende dingen te naaien. Leve het wereldwijze web zou ik zeggen.
Karolina

You can follow Karolina on instagram. Her feed is amazing and she is kind and beautiful. Thanx so much for your explanation. I think we can say we all love it!
Pin it
Wanna share this beautiful DIY or keep it? Pin it!
XOXO Nathalie
5 Comments
Cassandra Pater-Bosman
29 januari 2017 at 15:26Oh my god, i love it!! Echt ontzettend leuk gedaan!!§
Claudia Diependaal
30 januari 2017 at 07:56Wauw wat gaaf zeg….
Astrid
30 januari 2017 at 10:58Heel erg leuk zeg!! Hen nog niet zo
Creatief met een naald en draad anders wist ik het wel 😉
Natalie
19 november 2018 at 22:34Where are this sweet little dolls from, you have in your dollhouse?
Aliyah
30 november 2023 at 09:11Bravo on your blog post! It was well-crafted and engaging. I found the examples you shared to be relatable, and they helped solidify my understanding of the topic. To gain further insights, click here.